Getting Started
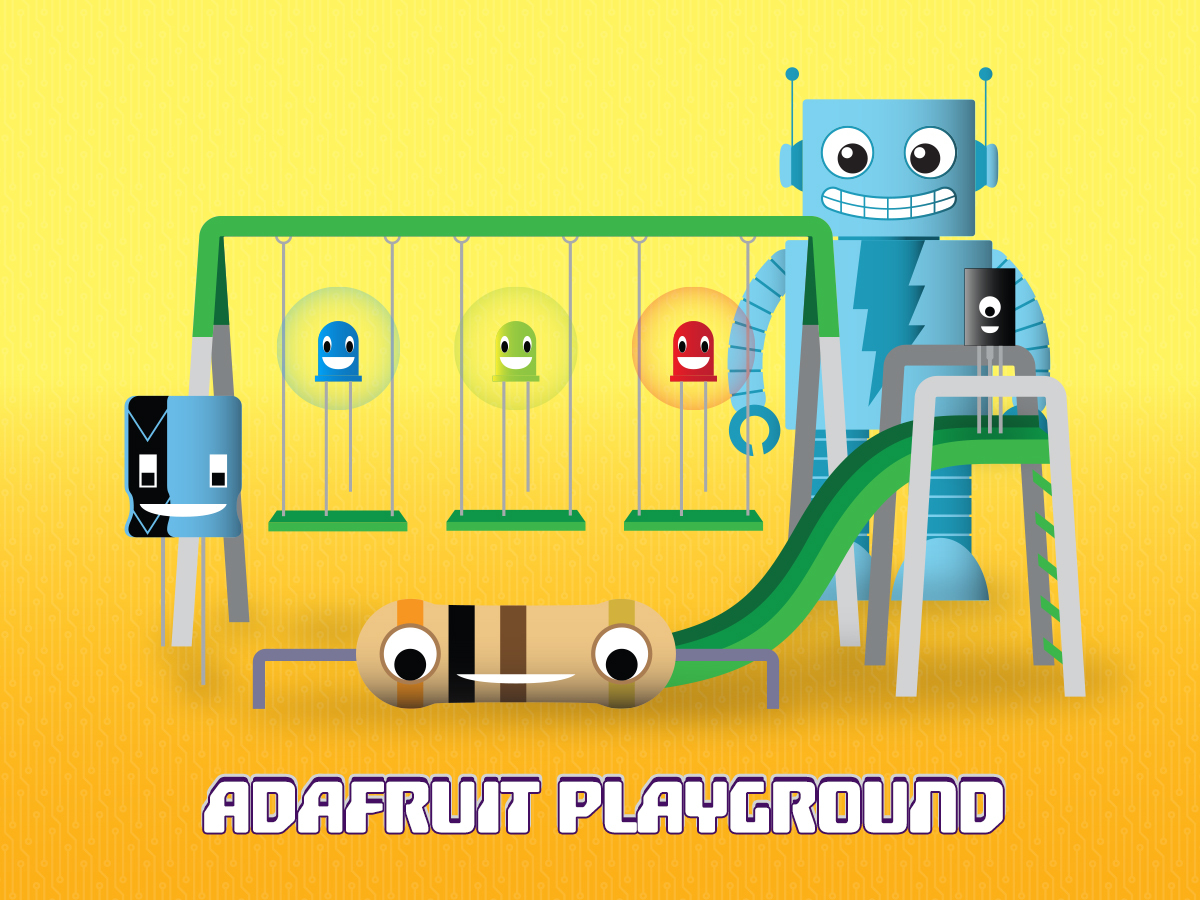
Adafruit Playground is a wonderful and safe place to share your interests with Adafruit's vibrant community of makers and doers. Have a cool project you are working on? Have a bit of code that you think others will find useful? Want to show off your electronics workbench? You have come to the right place.
The goal of Adafruit Playground is to make it as simple as possible to share your work. On the Adafruit Playground users can create Notes. A note is a single-page space where you can document your topic using Adafruit's easy-to-use editor. Notes are like Guides on the Adafruit Learning System but guides are high-fidelity content curated and maintained by Adafuit. Notes are whatever you want them to be. Have fun and be kind.
Click here to learn more about Adafruit Playground and how to get started.
-
KB2040 as I2C Bridge with GUI Control Use your KB2040 to create a USB to I2C Bridge to connect to your I2C Peripherals. The UXB-300 is a browser-based GUI builder that lets you wire up register-level controls of an IC without touching any code. Below are the details using the LPS22 as the peripheral.
Hardware Used:
USB Bridge: Raspberry Pi - KB2040 : https://www.adafruit.com/product/5302
Peripheral : Temperature & Pressure Sensor - LPS22HB: https://www.adafruit.com/product/4633
Schematic/Datasheet: https://learn.adafruit.com/adafruit-lps25-pressure-sensor/downloads
Cables: USB-C Cable between PC and KB2040 https://www.adafruit.com/product/4474
Qwiic cable between KB204 and LPS22HB https://www.adafruit.com/product/4399
The Arduino IDE 2.3.8 was used to create and load a sketch onto the KB2040. The UXB-300 was used to create a GUI to control the peripheral and display the results in real time.
Links to Sketch and GUI:
Arduino Sketch: m5stickC_esp32s3_i2c_oled.ino : https://github.com/labs16/KB2040-I2C-Bridge
UXB-300 LPS22HB GUI: https://apps.labs16.com/poverholt/kb2040_i2c_lps22
Just want to jump in? Connect to your KB2040 with LPS22HB Hardware, click the UXB-300 LPS22HB GUI link above, and skip to the Connect Hardware and Control with GUI step below.
Want to build it yourself? Continue to follow along…
Detailed Steps to do on your own: ( Define | Create | Connect )
The Raspberry Pi has USB OTG capability and is configured in the sketch to use serial protocol to send and fetch I2C commands. The UXB-300 GUI can be easily configured to communicate with the KB2040 and interactively communicate via I2C with the peripherals.
Since the KB2040 is used as a USB bridge, we need to define the serial data I will be sending and receiving between the KB2040 and the UXB-300 GUI over USB. The packet payload definition will, at a minimum, need to support the peripheral being used - in this case an LPS22HB.
Packet Payload Definition: (byte count varies with data length)
< Byte0 > < Byte1 > < Byte3 >< Byte4 >.....< Byte8 >
< Byte0 > = Mode/Size Byte and it contains information on whether it is a Block Transfer and the Size(Bytes) of the Data. The High Nibble determines if it is Block and the Lower Nibble is the size of the Data Transfer. A High Nibble of 0xB indicates a block transfer.
Example: 0xB2 means Block of length two bytes, 0x04 means non-block of length four bytes.
< Byte1 > = R/W Byte: Read = 0x72 and Write = 0x77
< Byte2 > = dev-id = 7-bit Device Address for the peripheral
< Byte3 > = ADDR = register address in Hex
< Byte4:N Bytes > = DATA sent / received
< Byte N+1 > ERROR Byte
The Packet Payload Definition above was used for this project. This definition is flexible — both the sketch and GUI packet builder are easy to adjust per your application.
The peripheral datasheet and peripheral schematic allow us to confirm the settings and that the definition above is sufficient. The peripheral is non-block with a data size of one byte.
Byte0 = 0x01
dev-id (7-bit) Device Address is as follows:
101110xb, where x reflects the SDO/SA0 pad state (labeled SDO/ADR on the schematic, pulled high to 3.3V via R4).
Byte 2 = dev-id (7-bit) = 1011101b = 0x5D
Table 16 from the datasheet provides the supported Register Addresses, which are one byte in size, together with the datalength which is shown to be one byte in size as well.
The ERROR Byte will be returned by the KB2040 (0x00 if no error, 0xFF if error)
This translates to the following for writing and reading from the peripheral using the KB2040 as a USB bridge.
Send: 0x01 0x77 0x5D
Fetch : 0x01 0x72 0x5D
- Bold indicates bytes returned from the KB2040 versus sent from the host.
The Arduino Sketch uses Adafruit’s KB2040 board, which is available via Board Manager on the Arduino IDE under Raspberry Pi Pico/RP2040/RP2350. The Adafruit NeoPixel Library was installed.
Normally you'd write something custom on the host side to read these registers — UXB-300 handles that, letting you go skip straight to the hardware. The tool is available at
Click Create to start a new project. Choose the sign-in path or create the device from scratch. If you are already signed in, you can select the LPS22 from the list of devices available, Otherwise, name your project, type in the Device ID (as noted above, the Device ID for this board is 0x5D) and select custom. Click on Create.

-
Klingon Fun for the Fruit Jam github project repository HERE
Search for Klingon words from the books "Kahless" and "The Final Reflection"
Files
ASCII ART IMAGES
- D7
- bird
- emblem
- fleet
- ship
- warbird
- blade
CODE
- code.py
- kahless.bmp
- kahless.py
- metadata.json
TEXT FILES
-
kahless.txt - info from "Kahless" by Michael Jan Friedman
-
klingonaase.txt - info from "The Final Reflection" my John M Ford
-
worf - Worf quotes
-
kahless.bas BASIC version of Kahless
Project description
KAHLESS is a reengineering of a C64 Basic program I wrote almost 30 years ago after I found a website listing Klingon words used in the novel "Kahless" by Michael Jan Friedman. My C64 program was written and compiled on an emulated C64. Interpreted string operations are SLOW - without the emulator running in "warp" mode, the program would not have been useable.
This project involved recovering the language info from the C64 binary (which I had posted in uuencoded form to a website). I then thought I should include some of John Ford's "Klingonaase" from "The Final Reflection" - happily I found https://afrodita.rcub.bg.ac.rs/~alexp/books/klingon.html which listed the vocabulary (fan and gaming sites have added more, but for this project I stuck to the words from these two classic Klingon novels (Available in the omnibus edition "The Hand of Kahless").
How to Use
On a Fruit Jam, copy all the files except kahless.bas to a directory "apps/KAHLESS". Then you can click on the KAHLESS icon to start the program. When run you'll see:
              |
              |
              |
             ' `
             | |
             | |
            '   `
         .-'|   |`-.
        /  /     \  \
       |__,\     /   |
      -'   \\   //\_ |
   ,-'   ___\\.//   `-__
  /__,--'       `--.____--
         `-._____.-'

-------------
What do you want to search for in the Kahless/The Final Reflecton lexicons?
Enter any string, for example "op"
-------------
What do you want to search for in the Kahless/The Final Reflecton lexicons?
op


Kerpach(a modern Klingon  (shopkeeper) KAHLESS

kleon               Enemy, or opponent.  Same, to a Klingon. [TFR]

  tai-kleon         Worthy opponent.  See 'kleon' above. [TFR]

teskas tal'tai-kleon  Compliments to a worthy opponent. [TFR]
Entries from KAHLESS are labeled, and entries from The Final Reflection are marked [TFR].
The program pauses 10 seconds then displays one of the ascii art files and gives the search prompt.
To use it as a sort of screen saver, type "dorandom" for the search. Then the program will display a random artwork, a random word from one of the two lexicons and then a random quote from Worf.
You can customize it by adding more quotes in the "worf" file.
Basic Version
Copy the file kahless.bas to apps/PyBasic/examples on a Fruit Jam. Then you can start PyBasic, and load "examples/kahless" and type "run"
What would you like to search for from Kahless or The Final Reflection? ? op Kerpach(a modern Klingon (shopkeeper) KAHLESS kleon Enemy, or opponent. Same, to a Klingon. [TFR] tai-kleon Worthy opponent. See 'kleon' above. [TFR] teskas tal'tai-kleon Compliments to a worthy opponent. [TFR]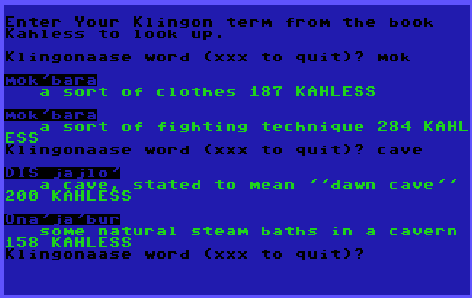 Original C64 program inspiring this project
 -
Import Eagle Part Libraries into KiCad 10.0 Import Footprints
Open the Footprint Editor. Then click Preferences - Manage Footprint Libraries...
A pop out window will open. Towards the bottom, click the down arrow next to the folder icon and select Eagle (*.lbr). Navigate to your Eagle library and select it.

-
CircuitPython-compatible WASM Port Want to try out a bit of code but don't have a CircuitPython board on hand?
Try out the browser-based CircuitPython WASM port!
This overhaul of the WASM port is built using the wasi-sdk and uses web assembly, an emerging technology finding increasing support in web browsers.
Here's what you can expect:

-
Obstacle avoidance for dji mini 3 Raspberry Pi 4/5 + SHIM, Adafruit TCA9548A (STEMMA QT), Adafruit VL53L1X (STEMMA QT), thinking of a plug n play vs. soldering.
-
Octoprint LED Status Crystal A LED status lamp for your Octoprint-enabled printer
github repo - GarronAnderson/octoprint-status-crystal: A 3D-printed status lamp for your octoprint-enabled printer
This lamp shows your printer's status and connects via the Octoprint API. It has a LDR for automatic brightness sensing.
The STL files are adapted from this Printables link.
Assembly instructions and photos are in the GitHub repo!

-
A NeoTrinkey "Small Friend" SmallFriend
A NeoTrinkey Morse code blinker -github repository
Project files to copy to your neotrinkey:
- friend.py - Program - rename as code.py to run on neotrinkey
- morse.py - encodes text to Morse code, prints it and blinks via neopixels
- tolkien - a batch of Tolkien quotes
- wise.py - code to select a random line from tolkien file
I was revisiting my earlier project "Teach your NeoTrinkey Morse code!" and thought it would be fun to add to it, coding a "small friend" that delivers messages in Morse code.
Project blinks some colors, then blinks out Morse for "hello." Then, touch #2 and two blue neopixels blink on and off, followed by blinking one of these words at random:
message1 = "friend"
message2 = "love"
message3 = "joy"
message4 = "peace"
message5 = "hi"
message6 = "hello"
If you touch #1 the blue "eyes" will wink and then one of the Tolkien quotes will be blinked out in code.
If you run the program while running an IDE like Mu or Thonny, it will print the text and the morse code.
You can replace the quotes in "tolkien" or create a new file with the text you want to have blinked out. If you create a new file, then change this line:
docode(getWD("tolkien"))to name the new file.
-
Homebridge Plugin for Adafruit IO Feeds Recently I wanted to try setting up Homebridge to interface with our Apple Home setup. What is Homebridge?
Homebridge is a lightweight Node.js server you can run on your home network that emulates the iOS HomeKit API.
It basically lets you connect non-Apple HomeKit supported devices to Apple Home. There are plugins that you install within Homebridge that can expose more features or let you customize how a device appears within the Apple Home app.
I decided that I wanted to try creating a plugin for Adafruit IO to send data from Adafruit IO feeds to Apple Home.
This was inspired by the work that Trevor did a little while ago with the itsaSNAP app. That iOS app lets you interface with Adafruit IO feeds within iOS. We wrote a lot of fun guides experimenting with the use of Apple Shortcuts combined with Adafruit IO.
One piece that was missing was the ability to have data go from IO to Apple Home. We could control devices already in Apple Home (usually Matter devices) with Shortcuts that integrated with itsaSNAP, but we couldn't send, for example, temperature sensor data from a feed to Apple Home and have it show up in a Room.

-
Bluesound Node Companion Introduction
We wanted an easy way to control a few aspects of our Bluesound Node box. While we could control the volume with the television remote, we could not easily switch inputs. Accessing favorites was limited to the set-top box and is restricted. For example we could not easily select a favorite saved in the Tune-In service.
This controller is simple on purpose. However, the way it's written it can easily be modified and gain expanded functionality. Pretty much if you can craft the URL to the Bluesound API, the sky is the limit!
Before You Begin
You'll need to familiarize yourself with the Bluesound API.
Full disclosure I found this document later in my efforts and only referenced it a little bit.
What I did find are some wonderful libraries with extremely helpful README documents. This is the one I referenced the most.
Once you get the gist of the URL format, it becomes finding exactly what you're looking for. The toughest for me was locating the specific URLs for the Tune-In favorites. Here's where to find them:
http://<IP of your Bluesound Node>:11000/RadioBrowse?service=TuneIn&url=presets

-
How To 3D Print Models from The Met Tools Needed
- Mobile Phone (iPhone used)
- 3D printer (Bambulab X1LC used) and filament (PLA used)
- Slicer Software - BambuStudio
- ImageToSTL website (https://imagetostl.com/convert/file/usdz/to/obj)
- STL repair website (https://www.formware.co/onlinestlrepair)
In this article from This Is Colossal, dozens of scanned objects from The Metropolitan Museum of Art are available to see. The page on The Mets website shows a decent list of artifacts that can be viewed in 3D in your browser. They feature high-resolution models with textures and even QR codes to scan for viewing in AR on mobile phones.
This got us thinking, if there's a model, we should be able to 3D print them, right?

-
Project StarTraffic Project Star Traffic Github repository
(scroll down to "How to Use" to see how to use the code)
My first PyBasic-->CircuitPython project, Project Starflight involved defining a set of ten star systems linked with three "tramline" exits to other starsystems. The goal of the project was two-fold
- See if I could write in BASIC after decades, using PyBasic and
- To try to use an LLM to translate it into Python, Python that I could adapt to work as CircuitPython
This worked pretty well, and I admit the bot did a decent job documenting my undocumented PyBasic code.
Following that I wanted to try something different.
I'm a big fan of the Star Wars ride at Disney, "Star Tours," both for the fun flight simulator effect AND the whole spaceport ambiance of the ride queue, including (see above) the Arrival and Departure displays (ala flight info in an airport). I thought it would be fun to create a running display of spaceship arrivals and departures in a Star Wars mode.
So beginning with my Starflight BASIC code, I reused the data structures defining ships, stars, planets and hyperspace exits. I used fantasynamegenerators.com to create "Star Wars"-esque ships, stars and planets, and now refer to the exits as "hyperspace lanes" (as is the current SW parlance :).
The program then generates the set of exits from each star, and in a new array, assigns each ship to one of the 10 star systems.
Next, in a continuous loop, a ship is chosen, and (if not currently in motion) it is assigned a new destination from one of the exits available. The location array for that ship now has the number of the destination star - to indicate it is moving there the number is recorded as negative (i.e. if going to star #3, "-3") is logged.
When being set in motion TO a star the program prints
Departing from [planet name] vessel [ship name]
heading for [destination]
note: each star has a "planet" associated with it. So departures originate from the planet to a star
if the ships location is a negative number, then the program prints:
[Ship name] arrived!!
[Ship name] arriving at [destination star]
Then changes the location value to a positive number to indicate it has arrived, so the next time the ship is chosen by the main loop, it will start from there.
Output looks like:
Do you need instructions? (y/n)

? y
This system will display current starship traffic
across a span of ten interconnected systems.

Ships travel from system to system via hyperspace lanes
and you will see arrivals and departures.


Departing from Uverrooith Vessel: Hellhound
heading for Krithuc.
Departing from Codachaa Vessel: BS Khan
heading for Pluedurs.
Hellhound arrived!!
Hellhound arriving at Krithuc
Departing from Guvor Vessel: Omen
heading for Krithuc.
Departing from Yorar Vessel: Hellhound
heading for Olutsos.
Departing from Vuthadoh Vessel: SC Providence
heading for Pluedurs.
Hellhound arrived!!
Hellhound arriving at Olutsos
SC Providence arrived!!
SC Providence arriving at Pluedurs
Departing from Uusnes Vessel: BS Nuria
heading for Sleak.
Departing from Lesti Vessel: Saber
heading for Sleak.
Saber arrived!!
Saber arriving at Sleak
How to Use:
There are three sets of code here: a PyBasic version, a CircuitPython app for FruitJam and a CircuitPython version for the NeoTrinkey.
PyBasic
- StarTraffic.bas - copy this to the examples/ directory under apps/PyBasic/ on a FruitJam. Then load and run. [note: you can run this under any PyBasic install]
FruitJam App
Copy these files into a directory on your FruitJam "apps/StarTraffic"
- code.py
- metadata.json
- startraffic.bmp (icon)
- startraffic.py
Then you can navigate on the FruitJam to the icon, click and let the program start.
NeoTrinkey
Copy these files to your NeoTrinkey:
- neoStarTraffic.py (rename as code.py)
- ncount.py support file for neostartraffic.py [provides blinky lights]
- prt.py support file for neostartraffic.py [allows redirect of output as if typed]
Change the variable REPL to True or False depending on whether you are running the program in a REPL like Mu or Thonny. If not the output will be directed via HID as if typed. If REPL=False the program will wait, blinking red and green till you touch one of the touch pads. This gives you a chance to move the cursor on the computer to where you want the output to show up (eg. in an editor window).
Touching the touch pads when the program is running will terminate it.

-
How to Repair Maschine Mikro Mk3 Pads Non-responsive Pads
Repairing Native Instruments Maschine Mikro MK3 pads involved opening the enclosure to clean the contact traces on the PCB, sensor pad and rubber elastomers with isopropyl alcohol and a Q-tip to remove debris (mostly cat hair).
This playground note will walk through the device teardown and cleaning the contacts and rubber elastomer pads.
Remove Bottom Panel screws
Start flipping the device over with the bottom panel facing up. Then, use a Phillips screwdriver to remove 14 screws from the bottom panel.

-
Can You Write a One Line CircuitPython Program to Create a Maze? There is a somewhat famous Commodore 64 program that created random mazes onscreen with a single line of BASIC code. The program accomplished this by randomly printing the slash "/" and backslash "\" characters, making a surprisingly accurate display of a maze. I was wondering if this could be done with a single line of CircuitPython code, so I set out to see if it was possible (spoiler alert: It can with a caveat).
Here is the one line of BASIC code for the Commodore 64 that produces random mazes:
This minimal program randomly prints either the slash "/" or the backslash character "\" and repeats the process in an infinite loop. The result looks like this:

-
Screensaver bundle for Fruit Jam OS This is a collection of screensavers written in CircuitPython for the Adafruit Fruit Jam OS, an operating system running on the Fruit Jam by Adafruit. This bundle contains 4 screensavers. Visit again to see if we have added more!
This repository is a collection of screensavers written in CircuitPython and created for the Adafruit Fruit Jam OS, an operating system running on the Fruit Jam by Adafruit. It is a credit-card-sized, RP2350-powered mini computer designed for retro emulation and other fun projects.
This bundle contains 4 screensavers:
- Weather Clock - A display containing the current date, time, temperature and weather icon
- 15 Puzzle - Images are split into sliding tiles in a 4x4 grid
- Maze - A screensaver that generates random mazes and then solves them in real-time.
- Star Field - a screen of moving stars reminiscent of a famous 1960s SciFi TV show.
The weather clock displays a simple view of the current weather and time. The background display also indicates whether it is currently daytime or nighttime (determined by sunrise and sunset times). In addition to the wifi settings, the location and timezone are configured in the settings.toml file. If not set, the weather and time for New York City are displayed. From the weather_clock_screensaver.py file, copy the LATITUDE, LONGITUDE, TMZ and METRIC lines to the settings.toml file on the CircuitPython drive and modify them for your location. Note: Latitude and longitude values can be defined either by direction (N,S,E,W) or by signed number. The screensaver requires signed numbers. So, for latitudes with an "S" and/or longitudes with "W", use a minus sign with the value.Set METRIC to 1 for displaying metric values (Celcius temperatures) or set to 0 for non-metric values (Fahrenheit temperatures).
For the 15 puzzle screensaver, a different image is chosen each time the screensaver is activated, then converted into tiles and slid within a 4x4 grid like the classic game. With the default settings, the tiles slide randomly for about 1 minute before resolving to the initial starting position, and then started again. Several images are included, but you can add your own to the ssbundle_assets/15puzzle folder, which should be 320 pixels width and 240 pixels height and 256 colors.
For the maze screensaver, 3 different size mazes are created, from easy to hard. You can change this behavior by modifying the MAZE_PICK line near the top of the file. You can change it to a specific size maze (0-2), random choice (MAZE_RANDOM), or the default display of the maze sizes in order (MAZE_SEQUENCE). The harder the maze, the longer it takes to generate the maze and solve it, so you will see a blank screen at the start when the first maze is being created.
For the star field screensaver, you can specify whether are not to show the star streaks by modifying the STREAK line near the top of the file to "True" or "False". You can also modify the number of stars to display with the STARCOUNT line, however, the more stars you have the slower the performance will be.
Installation
It is always best to install the latest version of CircuitPython . You will need to install the Fruit Jam OS for the Adafruit Fruit Jam. This will also include all the libraries needed by the Screensaver Bundle, so no additional libraries are needed.
Download the latest version of this bundle from the GitHub repository. Unzip the bundle and copy the screensaver files to the "/apps/screensavers" folder on the Fruit Jam. Run the Screensaver app on the Fruit Jam OS to choose one of the screensavers, or refer to the Fruit Jam OS learn guide for how to configure the screensaver manually.
-
Project Starflight - coding in PyBasic and CircuitPython Project-Starflight
Simple space game in PyBasic and CircuitPython - GitHub repository: Project Starflight
I've been enjoying playing with PyBasic on my FruitJam - trying the examples in the examples/ directory, and adding a few from http://www.vintage-basic.net/games.html (adapting the ones that didn't work at first).
I wanted to go old-school and write a program in BASIC using PyBasic. Been years (decades!) since I coded in BASIC, so it was a challenge. Eventually I got my Starflight.bas coded - worked fine, but then I wanted it in CircuitPython, so I asked duck.ai to find an AI that could do that. And... it did, even adding appropriate comments, even though I hadn't commented the BASIC version. I just needed a couple of tweeks to get it to work in CircuitPython. Runs fine on FruitJam and even NeoTrinkey (using the REPL in Mu.)
I used FantasyNameGenerators.com to create the ship names, stars and planets.
Just copy it to the FruitJam
- Starflight.bas - copy to apps/PyBasic/examples
- Starflight.py - copy to apps/PyDOS - I made a subdirectory "code/" and put it there. Just run PyDOS, and cd to PyDOS/code, then type "Starflight" For a NeoTrinkey, copy it to the name "code.py" - then run it with Thonny or Mu to see the program running in the REPL.
Program output:
Do you need instructions? (y/n)

y
You are commanding a rescue ship that is tasked
with finding a ship that has crashed in a remote system.
Each star sytem has at least 3 tramlines to other star systems.
Your job is to pilot your ship until you can reach the
lost ship.
                   Good luck.

Welcome Captain. Please sign in with your name.
joel
Captain joel we're reviewing ships available.
ENM: 4
You are now in command of Hellhound.
Your mission is to travel from ekuasims to ikreglault
where the target ship Saber is reported to be
crashed on trilles 992.

Current tramline exits are:
--------------------------------
1: naithef
2: ezlaoct
3: sehle

Choose your tramline
1
Current tramline exits are:
--------------------------------
1: sehle
2: ikreglault
3: ezlaoct

Choose your tramline
4
Invalid choice. Please choose 1, 2, or 3.
Current tramline exits are:
--------------------------------
1: sehle
2: ikreglault
3: ezlaoct

Choose your tramline
1
Current tramline exits are:
--------------------------------
1: poaph
2: baeccays
3: otaeks

Choose your tramline
2
Current tramline exits are:
--------------------------------
1: sroi
2: ikreglault
3: ikreglault

Choose your tramline
2
Congratulations! You have rescued Saber!
Pilot a rescue ship!


